Topics covered in this review:
- The reason I wanted to write this review
- Introduction to the TBS MOI+
- MOI+ specifications
- Setting up the MOI+
- Configuring TVHeadEnd
- Adding storage for recordings
- Saving the internal flash memory
- Using a different tuner card
- Keeping the time
- Connecting Kodi/XBMC to the TVHeadEnd backend
- Quirks of the TVHeadEnd software
- In conclusion
- Disclosure
The reason I wanted to write this review
I’m a long time satellite TV hobbyist, having having had a large C-band dish for a couple of decades now (I’ve acquired a few additional C-band and Ku-band dishes since then). Some think that satellite TV as a hobby is dead, but it really isn’t. There are still many signals up there, but if you’re still trying to make an old analog satellite receiver work, you’re not going to see much. Sorry, my friend, but the world has gone digital, and now you need a digital satellite receiver to see all the free TV in the sky.
You could go out and buy a standalone receiver for the purpose, but in most cases you are limited to connecting it to one TV set. If you hook it up to the TV in your Living Room, then you’ll need extra wiring and maybe a switch to also enjoy it in your bedroom. If you want to be able to watch the satellite signals you receive in any of several rooms of your home, or on your computer, tablet, or phone, that’s going to be rather difficult with a standalone box.
A couple of years ago, I acquired a HDHomeRun Dual device, and discovered how nice it was to be able to stream terrestrial TV signals to anywhere in my home via my local network. I set up a backend system so that I could record programs and enjoy watching them at my convenience. I wondered if it was also possible to do the same thing with the signals I received off my satellite dishes. So earlier this year I attempted to build a backend system that could receive free-to-air satellite signals and stream them to the various computers around my home, including the home theater PC’s that are connected to my HDTV receivers. Let’s just say that the first attempts didn’t work as well as I’d hoped. There is a huge learning curve, particularly if you’re not a programmer nor otherwise particularly geeky, and sometimes the hardware and the backend software just won’t cooperate.
Then I stumbled across a page on the TBS MOI+. I suspected that it might be able to accomplish what I’d been trying to do, and in a lot smaller package. So, I went online in an attempt to find some reviews on this device. To my surprise, little has been written about it, particularly in English. So, hoping to fill that gap, I contacted TBS and asked if they might be interested in providing a unit for review purposes. They graciously consented, and this review is the result. Just so you know, I did not promise to write only nice things about the unit, and I’m not getting paid anything for this review, beyond receiving the MOI+. So, this will be as honest of a review as I can make it.
Introduction to the TBS MOI+
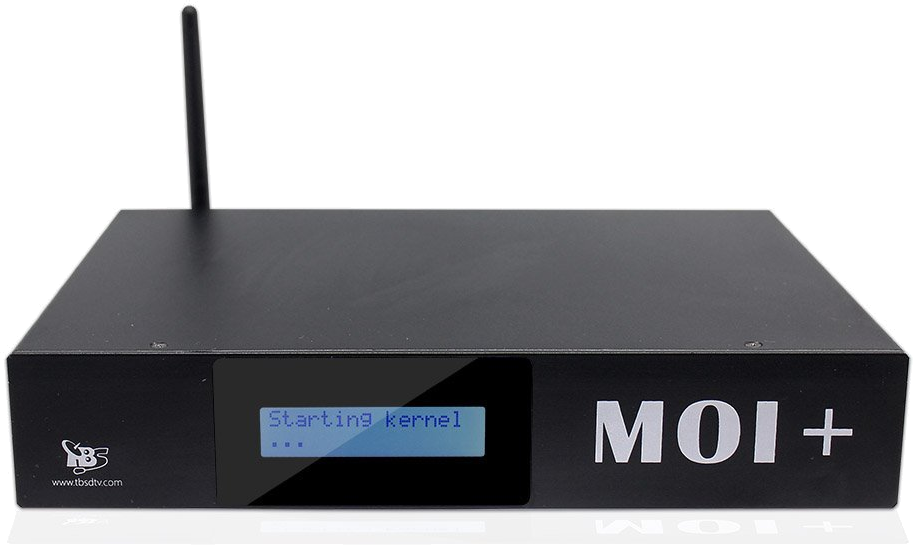
The TBS MOI+ is a standalone unit that streams satellite TV signals over your local network to PC’s, tablet computers, or phones, and with a small bit of effort can also function as a PVR. It runs Linux and has two different flavors of backend software installed, VDR and TVHeadEnd (actually, those are the only two that can be configured from a web browser, but the MOI+ also includes Mumudvb and DVBlast for more specialized applications). Therefore it can serve as a PVR or live streaming backend for Kodi (formerly known as XBMC), the popular multi-platform software that can turn almost any modern computer or tablet into a magic video box, and to other software clients that can receive such streams.
Please keep in mind that the MOI+ is not a standalone receiver – you cannot hook your TV directly to it, since it has no HDMI port. However, you can watch the received signals on a TV connected to a PC (some “smart” TV’s may be also be able to receive the streams directly). The sole purpose of the MOI+ is to receive and stream live and recorded satellite TV signals to other devices in your home. Outside of North America, it may also be able to receive terrestrial TV signals, depending on the region and the card installed.

As the unit is currently supplied in North America, it includes a TBS6991SE Dual Tuner Card with two CI slots. The description for that card states that “Inserting the correct CAM and subscription smartcard into the CI slot makes it possible to watch encrypted pay TV.” Unfortunately, that does not mean you can use it to receive North American commercial services such as Dish Network, DirecTV, Bell Expressvu, Shaw, etc. since they use a different authorization method that only works with their equipment. However, that particular card also works very well for receiving Free-To-Air satellite signals, which are available here in North America.
You can remove the supplied card and replace it with any of several other TBS PCIe cards, including the TBS6985 DVB-S2 Quad Tuner PCIe Card, in the event that two tuners aren’t enough for you.
I tested the unit using the supplied card, and I connected it using wired Gigabit ethernet. I’m not a big fan of using WiFi for streaming video, although the MOI+ has that capability.
The first thing I will say it that in my testing, it was able to flawlessly stream every free-to-air signal that I was able to receive, including a difficult 4:2:2 signal. With both tuners in use, and the device streaming previously recorded content to one computer, CPU usage was nowhere near being maxed out. As long as the tuner could lock onto the signal, the channel could be streamed or recorded.
MOI+ specifications
The specifications for the MOI+, taken from their product page, are as follows:
- System
- SoC: Marvell 88F6282 1.6 GHzCPU: Sheeva CPU core V5TE ARMRAM: 1GB DDR3Flash: 512MB NAND Flash
- Interface
- 2x USB 2.01x SATA portEthernet: 100/1000M Gigabit EthernetWifi: 802.11nProtocol: HTTP, UDP, RTP, TCPOS: Linux
- Preinstalled software
- Tvheadend, VDR, Mumudvb, DVBlast, szap, tzap, czap, dvbdate, dvbnet, dvbscan, dvbsnoop, dvbtraffic, dvbscan, scan-s2, szap-s2, dst_test, telnet, ssh, sftp, samba, oscam
- Client end support
- PC: Windows, Linux, MacTablet: Android, iOSSmartphone: Android, iOS
- DVB tuner support
- DVB-S2/S: 1 tuner cardDVB-T2/T: 1 tuner cardDVB-C/J.83B: 1 tuner card
Note that the unit will only accept one tuner card, and in the United States or Canada only a DVB-S or DVB-S2 card would be useful, but you would probably want a DVB-S2 card (which also receives DVB-S signals), since quite a few channels have converted to DVB-S2 in recent years.
The specifications note that there is a SATA port on the unit. That is true, but you have to remove the cover of the unit (which involves removing six tiny screws) to get at it. Unfortunately what is not available is a way to mount or power a SATA hard drive. There is enough room inside the unit for a notebook-style thin SATA hard drive, but there are no mounting holes or brackets. There is a connector on the main board that is not used, and its purpose isn’t identified, and it might in fact be a power connector, but I couldn’t be sure. So, when I hooked up a hard drive, I simply ran a SATA cable out the back of the unit, through the card slot opening, and connected it to an external SATA drive using a separate external power supply. This arrangement seems to work quite well.
This is a picture I took of the inside of the unit – sorry about the flash glare but I’m not a professional photographer. In this photo, the SATA connector is on the main board (the one on the left), just above the TBS logo. The unknown connector that might be power is above it, near the top edge of the board in this photo, next to the LAN port:

The published specifications don’t mention anything specific about the operating system, but the MOI+ appears to be running BusyBox, which describes itself as “The Swiss Army Knife of Embedded Linux.” BusyBox has become a rather popular on small devices such as this, and it offers much of the functionality found in larger Linux-based operating systems. You can find a full description and usage information at this link.
The preinstalled software includes the following:
- Tvheadend – a TV streaming server for Linux that also supports recording, it is configurable using a web-based GUI.
- VDR (Video Disk Recorder) – designed primarily to record and store digital video, configurable using a web-based GUI.
- Mumudvb (Multi Multicast DVB) – a program for streaming TV over a network.
- DVBlast – from the VideoLAN organization, a simple and powerful MPEG-2/TS demux and streaming application.
- dvbscan – a command line frequency scanning utility that is part of the LinuxTV dvb-apps
- scan-s2 – a command line frequency scanning utility very similar to scan
- szap, tzap, czap, dvbdate, dvbnet, dvbsnoop, dvbtraffic, and szap-s2 are all part of the LinuxTV dvb-apps. Few of these will be useful in North America.
- dst_test – appears to be some kind of test/demo utility that is useful when CI slot is used. Probably not useful in North America.
- telnet, ssh, sftp, samba – protocols for network connections to the MOI+. The latter two are useful for file transfers.
- oscam – Open Source Conditional Access Module software. Probably not useful in North America.
I suspect that most non-commercial purchasers of the MOI+ in North America will use either TVHeadEnd or VDR almost exclusively, and rarely touch the other software, except for the software that enables local network connections to the server.
Unfortunately, the MOI+ does not appear to include any software that will do true “blind scanning” of satellites (that is, software that will find all of the transponders, and the services contained within them, on a given satellite). With both dvdscan and scan-s2, you can only scan a single transponder, and you must enter the frequency of that transponder.
Setting up the MOI+
The MOI+ is what I would consider about average in terms of setup difficulty. Connecting up the hardware is easy, you simply connect your wires from your LNB(s) or switch(es) to either or both of the tuner inputs. There is an ethernet cable supplied with the unit and you connect that to your router or switch, or if you want to use a Wi-Fi connection you simply attach the included antenna.
When you power up the MOI+, it flashes a number of messages on the front panel display, but the one you will initially be most interested in is the IP address of the unit. It will grab an IP address via DHCP and you can then go to any computer on your network and browse to that IP address to verify that the unit is working and accessible via the network.
At this point, before you do anything else, I suggest you upgrade the unit’s firmware. The reason for doing this now is that whenever you upgrade the firmware it essentially performs a factory reset and you lose your existing settings, so there is no sense configuring anything until you have the latest firmware installed. The instructions for updating the firmware are in the first post in this thread, or after you have performed the initial firmware update, you can browse to the MOI+ IP address and click the button that says “Update Guide”. Note that you’ll need a USB flash drive with at least 1 GB of space, preferably formatted in FAT32 format (Linux formats such as EXT3/4 may or may not work). I do recommend copying all three of the mentioned files to the flash drive, so that all are updated. Note that you have a choice of kernels, one supports cards with DVB-S2 + DVB-T2 and the other supports cards with DVB-S2 + DVB-C. In North America you are not likely to be using a card that receives anything other than DVB-S2, so you can use either kernel, since both include DVB-S2 support. So copy either one of the kernel files, plus the other two mentioned files, to your flash drive.
When you attempt to download the firmware files, which are stored on Sourceforge, you may run into difficulty obtaining them from a North American site. If that happens, just switch to a different mirror site. I wound up getting the files from a mirror site in Singapore.
After the MOI+ finishes updating its firmware, you can go back to the web page and begin configuration. There are buttons in the left-hand column that show the available options. The first one is Network Settings:

By default it will come with DHCP enabled but you will almost certainly want to disable it and use a static IP address, so that your other computers can find it on your local network. Also, if you leave it on DHCP, it seems to pull a new IP address every time it reboots, or at least it did for me. So disable DHCP and enter a valid fixed IP address on your local network here, or alternately you could configure your router to assign the same IP address to the MOI+ every time it boots up.
I did not try enabling WLAN because as I mentioned before, I simply don’t care much for WiFi. It seems to me that if you are going to try to stream high bitrate video, you will get best results with a wired Gigabit connection. But, the ability to utilize WiFi is there if you need it.
If you don’t connect the supplied antenna to the unit, the front panel display will complain “Antenna Issue” at regular intervals, even if you don’t enable WLAN. But, that does not seem to affect operation of the device.
The next button gives you access to the Tuning Settings:

This page lets you select which backend software you want to use. When you check the desired button it will configure the program and take you to its interface. I elected to use TVHeadEnd since it seems to be preferred by Kodi/XBMC users. Note that when you elect to use TVHeadEnd, all the configuration of LNB’s, switches, etc. is done from within the TVHeadEnd interface. If you ever forget how to get to that interface, just come back to this page and click on TVHeadEnd and it will take you there.
I want to skip down a bit and mention the About page, since it contains information on how to log in to the device using ssh:

The about page shows the firmware version you are running, and also is a handy reference page for various ways to connect to the MOI+. Note that the address 192.168.8.188 is just an example address; you should actually use the IP address shown on the front panel display.
There are at least a couple of things that might give security-conscious folks a bit of concern. One is that you log in as root, using a default password (and there is no way to change it using the web interface). The other is that when you browse to the MOI+ SMB share, the entire filesystem is fully exposed:

While this can be very convenient, it’s not such a great thing if people you don’t fully trust have access to your local network. But keep in mind this is Linux, so if you know your way around in Linux then you already know how to make it more secure, should you deem that necessary. If you don’t know your way around in Linux, or don’t want to be bothered with additional security, then at least make sure your MOI+ is behind a router with a firewall that’s enabled, and don’t forward any ports to the MOI+ or do anything that would expose it to the wide open Internet.
The other side of that coin is that you Linux guys that like to tweak various software programs to make them better won’t need to figure out how to “jailbreak” a locked-down device in order to play around here. The true Linux gurus in the crowd might well be able to extend the capabilities of this device!
The Utilities page was really the only place where I ran into significant issues with the MOI+ web interface:

First I will note that at the bottom of this page there is a button you can use to reboot the MOI+ – I had totally missed that until I took the screenshot for this review! It is good that they provide that, but I wish there was also a similar button that would allow you to safely power down the device, particularly since there is no power switch on the unit – the only way to physically power down the MOI+ is to pull the power cord. You can safely power down the device by going into an ssh session and entering the poweroff command, but for those who would rather do it from the web interface, a “Power Off” button would be nice.
The page also offers a way to ping an IP address to make sure that the network connection is working. Strangely, it appears that if the ping is successful, it pops up a box saying “The IP is in the same IP range as MOI”, whereas if the ping is unsuccessful, the popup reads, “The IP is not in the same IP range as MOI”.
The real issue with this page is the time setting. No matter how many times I attempted to set it, refreshing the page would always show that I was in the time zone for Beijing, Hong Kong, and other parts of Asia, although the time itself would appear to be correct, and if I ran the date command in Linux it would show the correct time but the wrong time zone. So, you might ask, what is the problem? Well, the problem was that TVHeadEnd got confused about time. For example, if I told it to record a channel at 4:00 PM (or 16:00) it would then tell me the recording was scheduled for 17:00. It would actually record at the time I had set, but the saved recording would be timestamped an hour later than when it was actually recording.
The fix for this was to not use the web interface to set the time, but to follow these instructions in “Method 3 of 3: Using the Command Line” on this page (only up through step 4) and then rebooting. You may also want to edit the /etc/sysconfig file line that reads TZ=”Asia/Shanghai” to correctly reflect your region and city (you will know what those are if you followed the instructions mentioned above) but that doesn’t seem to affect TVHeadEnd as much as /etc/localtime not being correctly linked (if you do edit /etc/sysconfig, you may also need to run “chmod 644 /etc/sysconfig” afterward to make sure that the permissions are still set as they should be). I have no idea why the Utilities page wouldn’t set the time correctly for me, but one way to check whether it did is to ssh into the MOI+ and run the date command – if it shows the wrong time zone designator then it probably didn’t get set correctly. This was the only real issue I had with the MOI+ web interface.
There is one other issue with the time, however – the MOI+ doesn’t keep it very well, which is a bad thing if you intend to use it to schedule recordings of programs. Fortunately there is an easy fix, which I will discuss a bit later.
The TVHeadEnd Guide and the Update Guide are exactly what you would think they are – guides on setting up TVHeadEnd, and on how to update the firmware. Note that if you manage to really screw things up, you can re-update the firmware (using the same versions as you previously installed, if no new version is available) and it will have the same effect as a factory reset (one user reported that if it’s only the TVHeadEnd configuration that is irreparably messed up, running rm -fr .hts/* from the command line will give you a fresh start, but that may not always work). Obviously, a firmware update is not something you want to do frivolously, because you will need to re-enter your settings after you have completed the update. If there is a way to save your entire TVHeadEnd configuration to a file that can the be re-imported back into TVHeadEnd, I have not discovered it yet.
Configuring TVHeadEnd
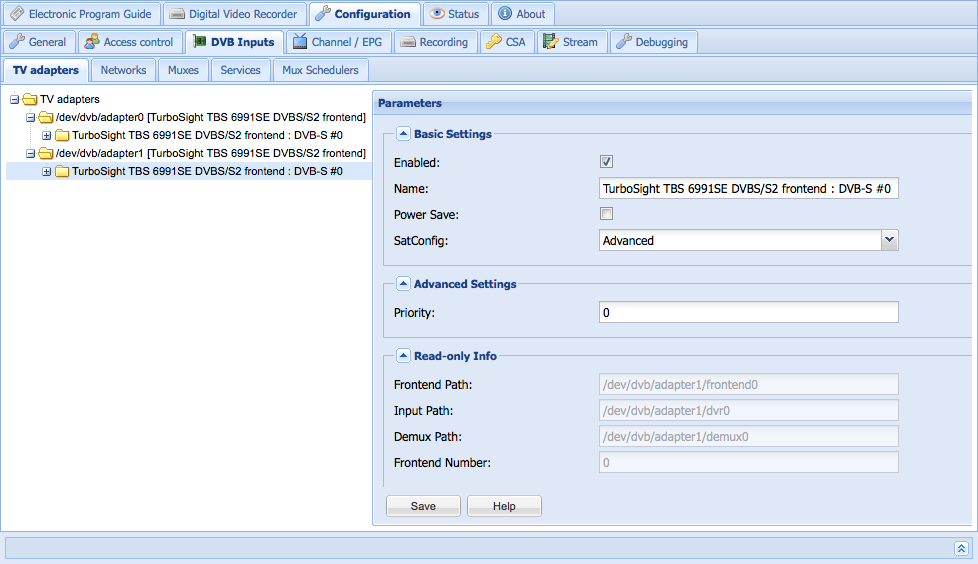
As noted above, there is a menu selection in the MOI+ web interface that shows you how to configure TVHeadEnd (also available here), and it should be enough to get you started. For the most part you can just follow those instructions, but there are a few things that North American users should be aware of. For one thing, TVHeadEnd assumes you’ll be using a Universal LNB, which is not something used all that often in this part of the world. Here, you are much more likely to be using a standard (Ku band) LNB, or even a C band LNB. But when you are setting up the TV adapters, you won’t find an option for those. The trick is that you need to select “Advanced” in the SatConfig dropdown, then save it, and then you will notice that in the left hand menu tree, additional options are exposed. This is how TVHeadEnd seems to work; it doesn’t show you options that are not applicable to your existing configuration, so as you make the configuration more complex, more options are exposed.
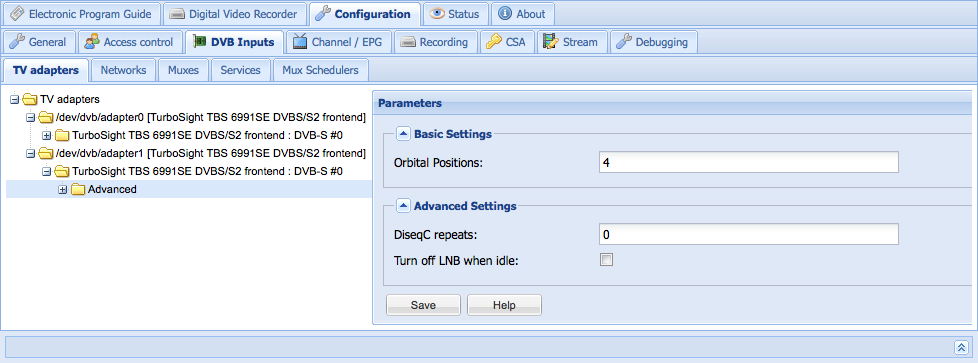
So once you have selected the Advanced setting and clicked Save, you can expand the tree view an additional level and click on Advanced, where you will select the number of orbital positions that each tuner has access to, which is 1 if you are connecting a tuner directly to an LNB. If you are connecting to a 4 port DiSEqC then it’s 4, as shown here:
After you save that, then you can configure settings for each of your orbital positions, including LNB type. In North America you will probably want to select either “C-band” or “Circular 10750”. You would use the latter for any standard Ku band LNB that has a LO Frequency of 10750 MHz, even if it’s not circularly polarized. Keep in mind that this type of software (or at least the satellite tuning portion) is much more widely used in Europe and other places outside North America, and they are much more likely to be using a circularly polarized LNB than we are here.
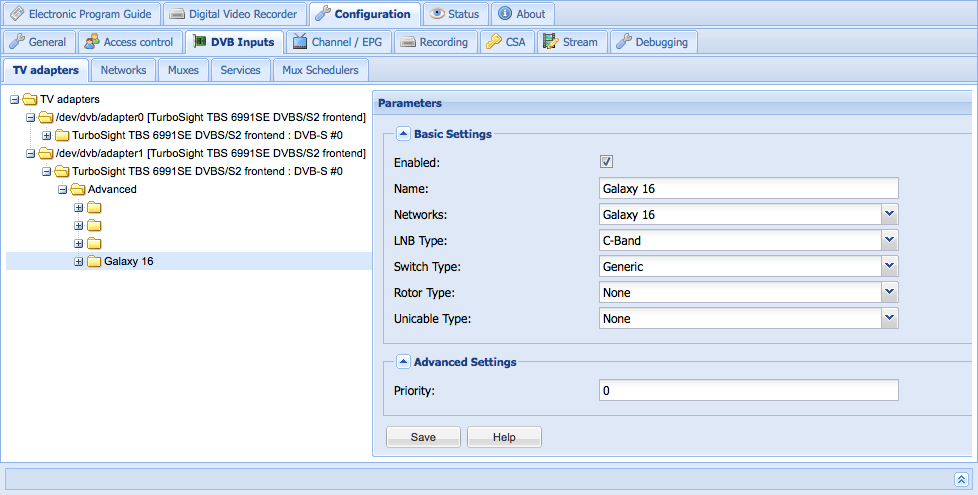
If you are using a standard DiSEqC and/or 22 kHz tone switch, then select “Generic” for the switch type. For a four port DiSEqC switch, you would use the “Committed” dropdown and select the port there. TVHeadEnd uses AA, AB, BA, BB port descriptors, which correspond to DiSEqC switch ports 1, 2, 3, and 4 respectively. I had no problem using a standard 4 port DiSEqC switch (well, except that it turned out that the brand new DiSEqC switch had a bad port 4, but that’s obviously not the fault of TVHeadEnd or the tuner). In the screenshot below, DiSEqC port 2 (AB) is selected. Settings for any types of switches you don’t have should just be left at the default settings.

One other consideration for North America is that it is extremely rare for the free-to-air signals to include Electronic Program Guide data. Therefore, it would be a good idea to go to Configuration | Channel / EPG | EPG Grabber and in the Over-The-Air Grabbers section, uncheck all the grabber selections. None of those will work in North America anyway, so there’s no sense burning up CPU cycles checking for EPG data that will never appear. I will have a bit more to say about getting EPG data later in this article.

Adding storage for recordings
In testing the MOI+ I found that the best way to add additional storage is to add an external SATA hard drive with its own external power supply. It should be formatted using EXT4 format, which will be much easier if you have access to a computer that runs a full version of Linux, such as Ubuntu. If you don’t have any computers that have Linux permanently installed, keep in mind that you can always download a “Live” version of a distribution such as Ubuntu, and run it from a DVD or a flash drive long enough to format a hard drive. I temporarily hooked up the drive to my home theater PC box that runs Ubuntu, and formatted it there.
When formatting the drive, I used GUID partitioning rather than MBR. If your drive is larger than 2 TB then you really don’t have a choice – you must use GUID!
If you have a MOI+ that comes with the same TBS6991SE card that the one I’m reviewing did, and you are not using the CI slots (as you would not be in North America), then you can run the SATA cable out though the hole where the CI cards would be inserted. If you decide to use a different TBS tuner card, there is a little insert next to the card tab that is held in place with two screws and that must be removed in order to add or remove a card. You can just leave that off and run the SATA cable out through that hole. If the cable is likely to get jiggled a lot, I’d be inclined to wrap some electrical tape around it at the point where it comes out of the hole. The edges aren’t particularly sharp, but a lot of repeated jiggling could eventually wear through the SATA cable’s insulation.
Once you connect the SATA drive and boot up the MOI+, it will display “SATA mounted” as one of the front panel messages. You should then be able to browse to the drive at /mnt/disk, and in TVHeadEnd under Configuration | Recording | Digital Video Recorder you can specify something like /mnt/disk/recordings as the Recording system path, and the in the Timeshift tab you can specify something like /mnt/disk/timeshift as the Storage Path (don’t forget to check the Enabled box if you want timeshifting to work).
One minor annoyance is that if you connect to the SATA drive from another machine on your local network via SMB, it does not show the free space on the mounted drive accurately, but instead shows the free space remaining in the MOI+ internal storage. This may prevent you from copying large files to that drive via SMB, though I can’t think of any reason you’d want to. TVHeadEnd has no problem with saving large files to the drive, and if you really feel the need to copy a large file to the drive you can always use SFTP, which works fine for the purpose.
In case you are wondering, when TVHeadEnd saves recordings to the drive, it saves them as .ts (MPEG transport stream) files, which can be copied and played using any software that recognizes that file format (such as VLC). Of course, Kodi/XBMC can also play the recorded programs.
There are two USB ports on the device but it appears they only recognize devices formatted as FAT32, which you definitely don’t want to use for saving satellite recordings due to the limitations of that filesystem. Also, it appears that a FAT32 device is only automatically mounted for a short time at bootup for the purpose of accessing any update files and installing the updates. If you want to access a device plugged into the USB port thereafter, you will need to ssh into the device and issue a mount command from the command prompt. A Linux guru may well be able to get more functionality out of the USB ports, but I am not a Linux guru and my SATA connected drive worked perfectly, so I really didn’t attempt to do much with the USB ports.
The only downside of using a SATA drive is that there is no provision for mounting it inside the case. I mentioned earlier the question of whether there is a power source available that is capable of powering the drive. That said, there is certainly available enough room inside the case for a laptop-size hard drive, but there are no mounting brackets or any other obvious way to mount one there. But in our testing, an external SATA drive powered by a separate external power supply has been working very well for recording programs.
Saving the internal flash memory
If there is one thing that I think might have been a questionable design choice for this unit, it is that the flash memory is not removable and replaceable. What this means is that eventually, hopefully after many years of use, the internal memory will have received the maximum number of write cycles that it will accept, and it will begin to fail. If that happens, the entire device will likely fail and there will be no easy way for the end user to bring it back to life. So, it’s preferable to limit what is written to the flash memory, and one of the biggest offenders is log files, since they are continuously created.
For those knowledgeable in Linux, an easy solution is to symlink the /var/log file on the device to a directory on the hard drive. Of course, you only want to do that if you have added a hard drive and plan to leave it continuously connected.
There are plenty of pages on the Internet that explain how create a symlink in Linux so I won’t cover that here. But basically, there are five broad steps to making this work:
- Create a directory on your hard drive to hold your log files, and make sure that ownership and permissions are the same as for the original /var/log directory.
- Copy the existing contents of /var/log to your new directory.
- Rename the existing /var/log directory to something like /var/log.backup
- Create the symlink, linking /var/log to your new directory.
- Verify that if you do “cd /var/log” and then list the contents of the directory, you see the original contents of /var/log (which should be the same as in /var/log.backup). If it looks okay, reboot the device.
Please do not attempt this if you aren’t familiar with Linux, because if you mess things up and accidentally delete any vital files, you could wind up having to do a full firmware reinstall, and you would lose your entire current configuration!
By the way, I am not suggesting that the log files are the only files that are sufficiently large, or updated frequently enough to consider moving them to the hard drive. As I gain more experience with the MOI+, I may well decide that there are other files or directories that fall into that category. I just wanted to point out that it is possible to do this.
In my attempts to ascertain how much of an issue this really is, I discovered that the primary filesystem on this device is formatted using yaffs2, which I had never heard of prior to encountering it here. This is revealed if you run the mount command:
[root@moi /]# mount
rootfs on / type rootfs (rw)
/dev/root on / type yaffs2 (rw,relatime)
proc on /proc type proc (rw,relatime)
devpts on /dev/pts type devpts (rw,relatime,gid=5,mode=620)
tmpfs on /dev/shm type tmpfs (rw,relatime,mode=777)
tmpfs on /tmp type tmpfs (rw,relatime)
sysfs on /sys type sysfs (rw,relatime)
/dev/sda1 on /mnt/disk type ext4 (rw,relatime,barrier=1,data=ordered)
The final line of the above output is the attached SATA hard drive.
My understanding is that yaffs2 is designed to be more “friendly” to flash memory than some other, better-known filesystems, by minimizing unnecessary writes, so at least the designers of the MOI+ appear to have taken the limitations of flash memory into account. However, this cannot prevent application software from performing excessive writes.
If TBS ever comes out with a second generation MOI+, I would hope they would consider using removable and replaceable flash memory, perhaps a SD card such as is used by the Raspberry Pi. That way, if the memory ever does go bad, the user could simply replace it, reload the firmware, and get the device working again. Another potential improvement that could work with the existing hardware would be to give users some way to copy the entire system from the internal memory to the hard drive, and then run it from there, so that virtually all writes go to the hard drive and not the flash memory. Unfortunately, I’m not familiar enough with Linux to be able to tell you how to do that, or whether it’s even possible.
Using a different tuner card
I wanted to test this unit using multiple tuner connected to DiSEqC switches, so I swapped out the provided card with a TBS6985 DVB-S2 Quad Tuner PCIe Card. At one point I had four tuners recording high definition signals, and I was simultaneously playing one of them using XBMC on my computer. I also ssh’ed into the MOI+ and found that the CPU was hardly breaking a sweat – it rarely edged up to around 25% but that was about it. The recordings made with this unit have virtually flawless.

The above photo shows the MOI+ with the TBS-6985 tuner card installed, and also the SATA cable for the external drive. I did have one small issue after installing this card with regard to TVHeadEnd, which found the card and showed the tuners properly, but when I tried to scan for signals it didn’t appear to be receiving anything.

It turns out that for some reason, when a TBS-6985 card is installed TVHeadEnd identifies the tuners in the reverse order of what you’d expect. So, whereas you might expect tuner port A to be mapped to adaper0, and tuner port D to be mapped to adapter3, in fact it’s exactly the reverse, where tuner ports A, B, C, and D are on adapters 3, 2, 1, and 0 respectively in TVHeadEnd’s configuration. Once I figured that out and adjusted my TVHeadEnd configuration accordingly, it worked great! So if you ever install a different tuner and it doesn’t seem to be working, make sure it’s not simply an issue of the tuners being mapped in reverse order to the adapters in TVHeadEnd. Note that this reversal did not occur with the original tuner card that was installed in the device, so you might or might not see this happen with any given TBS tuner card.
Note that you can’t just plug in any old DVB tuner – since this is a TBS device it quite naturally assumes you will be using a TBS card. And only certain cards will work (there is a list at the bottom of the product page). It accepts certain TBS DVB-S2, DVB-T2/T/C, and DVB-C tuner cards, although the latter two types would not be very useful in North America.
Keeping the time
If you plan on using the MOI+ to record programs on a schedule, then it is rather important that the system time be accurate. The device is not configured by default to sync up with any time servers on the Internet, and unfortunately its internal clock has a tendency to lose several seconds per day. But, you can make the MOI+ synchronize the time once by running this from the command prompt:
ntpd -q -p north-america.pool.ntp.org
If you are not in North America or wish to use a different NTP time server (perhaps one on your own network), substitute it for north-america.pool.ntp.org. Or, you can just use pool.ntp.org, which should connect you to a nearby server. You can make ntpd run as a service until the next reboot by leaving out the -q option,
Note, however, that if you change the time while TVHeadEnd is running, and you do not reboot immediately afterwards, your recordings are likely to have incorrect time code information. This is probably the most annoying quirk of TVHeadEnd that I have encountered. I strongly suggest that you don’t ever run any command that impacts the system time if you do not plan to reboot afterwards, because what happens is that TVHeadEnd will make recordings that are challenging to play, especially if you like skip forward or backward while viewing a program. Also, the reported duration of the recording may be wrong – for example, I’ve seen a one hour program reported as a two hour program. I’ve never actually had a recording that could not be viewed at all, but viewing the program was a lot less enjoyable when I couldn’t skip backwards or forwards, or use fast forward or rewind.
The solution to that is to start ntpd as a service every time the system reboots, and before TVHeadEnd starts. To do that, you need to add a script in the /etc/init.d directory named S95ntpd. The “S95” part of the filename sets the priority, and should cause the script to run after your network connections have been established, but before TVHeadEnd is started. Here is a sample S95ntpd script:
#!/bin/sh
#
# ntpd        Starts ntpd
#

start() {
	echo -n "Starting ntpd: "
	/usr/sbin/ntpd -p north-america.pool.ntp.org
	echo "OK"
}
stop() {
	echo -n "Stopping ntpd: "
	killall ntpd
	echo "OK"
}
restart() {
	stop
	start
}

case "$1" in
  start)
	start
	;;
  stop)
	stop
	;;
  restart|reload)
	restart
	;;
  *)
	echo "Usage: $0 {start|stop|restart}"
	exit 1
esac

exit $?
Don’t forget to change the time server address to the one you prefer to use, if you don’t want to use north-america.pool.ntp.org. After adding the script, open a ssh session and run this to make the script executable:
chmod 755 /etc/init.d/S95ntpd
After rebooting the system you can run this to see if ntpd is running:
ps aux | grep ntpd
You should see something like this:
 1035 root       0:00 /usr/sbin/ntpd -p north-america.pool.ntp.org
30856 root       0:00 grep ntpd
It’s the first line that is important; as long as that is there you know that ntpd is working.
I am not a Linux coder so for all I know the above may not be the best possible example of such a script, but it seems to work for me (if you have any problems, try replacing the leading spaces in the lines with tabs). Also, the above script only works when you have a working Internet connection. If you are going to use the MOI+ in a situation where you don’t have Internet access, I have read that you can use the adjtimex command to fix the drift of the system and hardware clocks, but that is beyond the scope of this article.
If you go into the TVHeadEnd Configuration | General section, you may notice checkboxes for “Update time” and “Enable NTP Driver”. If ntpd is not running then these settings will not persist, and if nptd is running and you set them, at least in my experience you’re likely to get recordings with bad time code information, which as mentioned above can make playing them a challenge. And, the settings still will not persist through the next reboot. So, my advice is that you don’t check either of those boxes.
Connecting Kodi/XBMC to the TVHeadEnd backend
Once TVHeadEnd is up and running it is easy to connect Kodi or XBMC. All you need to do is this (from the XBMC Wiki):
- Go to Settings -> Add-ons -> Enabled add-ons -> PVR Clients and select the Tvheadend add-on
- Select “Configure”
- By default, you should only need to fill in Tvheadend hostname or IP address.
Quirks of the TVHeadEnd software
This is not properly part of the review of the MOI+, but should you purchase one I’d like to see you as happy with it as I am with this one. TVHeadEnd has a bit of a learning curve, to put it mildly, but fortunately it’s not that hard to get it set up and to get it streaming to Kodi/XBMC, or whatever other compatible software you’d like to use. I’ve used at least two other backend programs prior to TVHeadEnd (Mythbuntu and MediaPortal). TVHeadEnd is, for the most part, definitely easier to configure than either of those once you figure out that certain options aren’t exposed until you select another option that requires them. When I was trying to get MediaPortal to work, one of the things that really drove me batty was their screwy method of handling DiSEqC and 22kHz tone switches. In contrast, TVHeadEnd handles things like that in a much more logical manner, although you do run into the occasional weird thing (like the tuners sometimes being mapped in reverse order). Still, with one exception (importing guide data), this was the easiest of the three programs to configure, in my opinion.
But TVHeadEnd does have a few weird quirks. One is that after you have mapped services so that they appear in the Channels tab (under Configuration | Channels / EPG), you will probably want to try to rename many of them. Under the Channels tab (NOT Services), you can rename a channel by clicking on it, then clicking the Edit button, and then changing the name. BUT if you do that, what you may find is that Kodi/XBMC or whatever you are using can no longer tune in that channel! The fix for that is to delete the channel under the Channels tab, go back to Configuration | DVB Inputs | Services and map the channel again, and then before you attempt to rename it again, clear the cookies from your browser and reload the page (or use a different browser to do the renaming). I have no idea what causes this problem, or why clearing cookies or using a different browser works, but it was the only way I could get all the channels renamed the way I wanted.
When you have added your LNB’s, DiSEqC and/or tone switches, etc. and configured everything according to the instructions, TVHeadEnd does an initial scan of the transponders on that satellite. This does take some time, so don’t be in too big of a hurry to go in and map services. However, it does not seem to find all the transponders, and I had to add several of them manually (particularly the ones using DVB-S2). I don’t know whether TVHeadEnd actually has some kind of blind scan logic, or if it is using a transponder list that may be somewhat out of date (I suspect the latter), but it doesn’t find everything up there without some assistance.
One problem we have in North America is that most of the available signals on the satellites do not include embedded guide data, which is sometimes referred to as Event Information Table (EIT) data. In other parts of the world this information is commonly provided within the satellite signals themselves, and therefore software developers based in Europe, Asia, or Australia/New Zealand tend to assume it’s available everywhere, which makes it far more difficult than it should be to utilize certain other backend software.
Getting guide data into TVHeadEnd is a subject for its own article, but I will just say this much. If you plan to use an xmltv.xml or similar XML format file, as produced by a program such as zap2xml, you will likely need to create that file on a different machine than the MOI+ and then transfer it over to the MOI+ via SFTP or SMB. If you dig around in the TVHeadEnd documentation and on their forum long enough, you will discover that what you need to do is obtain a file called tv_grab_file and place it into the /usr/bin directory on the system running TVHeadEnd. And if you do that on the MOI+, it won’t work, because the original tv_grab_file is a bash script, and BusyBox doesn’t run bash, it uses ash instead. Fortunately, a converted script is available, thanks to the efforts of Harald Becker, a participant on the BusyBox mailing list. Here is the converted tv_grab_file script that will run on the MOI+:
#!/bin/sh

if [ $# -lt 1 ]
then
  cat /mnt/disk/.xmltv/tv_grab_file.xmltv
  exit 0
fi

while [ $# -gt 0 ]
 do case "$1" in
   -d | --description )
     printf "tv_grab_file is a simple grabber that just read the ~/.xmltv/tv_grab_file.xmltv file\n"
     ;;

   -v | --version )
     printf "0.1\n"
     ;;

   -c | --capabilities )
     printf "baseline\n"
     ;;

    -* )
      printf "unknown option: %s\n" "$1"
      printf "Usage: %s: [--description] [--version] [--capabilities]\n" ${0##*/}
      exit 2
      ;;

 esac; shift
done

exit 0
Note that you may need to modify the path or filename in the line that starts with “cat” – it should point to the xmltv file that you want TVHeadEnd to use. I copy the file to the hard drive to so as not to use space on, or cause unnecessary writes to the device’s internal memory. Save the above script with the filename tv_grab_file and copy it to the /usr/bin directory on the MOI+. Then, open a ssh session and run this to make the script executable:
chmod 755 /usr/bin/tv_grab_file
One other thing to note is that even after TVHeadEnd successfully reads in an XML file for the first time, it may take a while for the channels in that file to become available for mapping, which is done in the same place where you edit channel names. The channels in your XML file should appear in the EPG Source dropdown, but there may be some delay. If they don’t appear, rebooting the MOI+ may help.
In case you are wondering where you tell TVHeadEnd to use the tv_grab_file script, that’s under Configuration | Channel/EPG | EPG Grabber, in the Internal Grabber section. After you have installed tv_grab_file and fixed the permissions, you will probably need to reboot the MOI+ to make this option appear.

The grab interval can be whatever you like, it is simply how often TVHeadEnd tries to re-import the XML file. Since the guide data on most sites is only updated once a day anyway, and since you apparently can’t control the time of day at which TVHeadEnd runs the tv_grab_file script, running it twice a day will at least refresh the script within 12 hours of the time the XML file was copied over to the MOI+.
The above is not a complete guide on getting schedule data into TVHeadEnd on the MOI+ (as I mentioned above, that may be the subject of an upcoming article) but if you know your way around TVHeadEnd, the above should get you through the major hurdles.
I should mention that TVHeadEnd does have one glaring deficiency – if you don’t have schedule data available for a particular channel, then to the best of my knowledge you cannot set up a recurring recording on that channel. You can tell it to record once at a specific time on a specific channel, but without schedule data there is no way to specify that you want to record that same channel at the same time every day or every week. If all else fails, you could always create your own schedule data for a channel in XMLTV File format, but again, that would be a subject for an upcoming article, if there is any interest in that.
One other quirk worth mentioning is that when attempting to tune live TV from the MOI+ and TVHeadEnd using XBMC Gotham 13.2, on rare occasions it will at first display video but no audio. This never occurs with recordings, only with live TV, and reselecting the channel always fixes the problem. Once the sound starts playing, then it is okay from that point on, and the audio does not subsequently disappear (unless the channel itself drops the audio). I suspect this is a problem with XBMC or perhaps the XBMC PVR add-on for TVHeadEnd, rather than TVHeadEnd itself, because if XBMC is receiving video then it’s receiving the transport stream, which always contains the sound (assuming there is sound available, of course).
In conclusion (finally!)
Let me just put it this way, I had previously built up a backend system using Windows 7 and MediaPortal, and the TBS6985 Quad Tuner card I mentioned above was originally purchased for use in that. But I always had issues with MediaPortal, such as missed recordings and partial recordings, which I think are in part attributable to the fact that it has issues controlling DiSEqC switches. It took me the better part of the summer to get that system running halfway well.
Yet when I saw how well the MOI+ worked, I took down that system and installed the TBS6985 in the MOI+ and I am MUCH happier with the way the MOI+ works. It’s not that there are no challenges at all to getting it working, but after only a week of use it was working better than the previous system did, despite fully two months of banging my head against the wall (figuratively speaking) trying to get the previous backend to work properly.
Now I realize that some readers may think that I am only giving a relatively glowing review because TBS sent me a free unit for evaluation. All I can say is that I don’t do that; I tell it like it is, and overall I really am happy with this device. Plus, if you notice all the hints and tips for configuration that I have given above, you will realize that I have spent a considerable amount of time with the MOI+ and TVHeadEnd. I’ve had no previous exposure to either, other than looking at TVHeadEnd one time for about 20 minutes, so I had to put the time in to learn how to do certain things, and I would not have made that effort if I didn’t like the results I was getting. If nothing had been working out, it would have been much easier to just stick with my old system and write a four or five paragraph review, and let it go at that. But the more I used the MOI+, the more impressed I was with it.
As I write this, the MOI+ is available at Amazon (and note that is NOT an affiliate link, so it doesn’t put a dime in my pocket if you buy one). When comparing prices, keep in mind that it can essentially replace a computer running a backend server. Also, if you are considering it for any kind of commercial installation, there are brackets that can be attached to make the MOI+ rack mountable.
Thank you for reading this review, and if you do decide to purchase a MOI+, I hope that my configuration hints are helpful to you!
Disclosure:
Just in case you somehow missed it the first two times I mentioned it, I did get a free MOI+ in exchange for the promise of writing this review. However, I did not promise to write anything specific or to only say favorable things about the MOI+. Hopefully, I’ve now made that clear enough to keep our friends at the FTC happy!
Possibly related articles:
Do you run one or more TBS PCIe cards under Linux? Check your IRQs… (Free-To-Air America)
Getting bad satellite recordings in TVHeadEnd? Here’s a possible fix (Free-To-Air America)
New TBS6704 ATSC/Clear QAM Quad Tuner PCIe Card may let you add OTA and/or unscrambled cable TV channels to your satellite backend (Free-To-Air America)
Moi Pro AMD with OpenElec TBS builds (BuyDVB Online Store Blog)

Excellent and accurate write up. I have just bought a few of these boxes (DVB-T2 and DVB-S2). They seem great, but the TV HeadEnd setup can be fiddly. Especially glad you mentioned the reversal of the LBNB assignment. That confused the hell out of me, until TBS wrote and told me about this odd switch in TVheadend. Their support is rather good, actually.
I bought this box with DVB-S2 Dual Tuner Dual thinking of streaming different channels to different clients but wondering now if you can stream channels outside your network to different clients or time zone? Also if so how do you make an m3u8 file or iptv list with tvheadend software which is not very user friendly if you are an windows user?
These are really TVHeadEnd questions and I’m not able to give you truly informed answers because I’m not doing anything like this, but I believe I read somewhere that streaming outside of the local network isn’t officially supported due to copyright issues (I may be thinking of MythTV or some other backend software, however). That said, for your own personal use, if you have a router that supports a VPN (specifically, acting as a VPN host/server), then in theory you could install compatible VPN client software on a computer elsewhere in the world, and from a functional standpoint it would effectively be the same as if you were on your own local network. I’m sure there are other ways to do it as well, by forwarding the correct ports in your router, but this opens you up to security issues that you don’t have if you use a VPN. Since the MOI+ by default does not have any kind of firewall software protecting it that I’m aware of, unless you know what you are doing I’d personally stick with the VPN solution rather than expose your MOI+ to the Internet. You may have to install alternative firmware (such as DD-WRT or Tomato) on a supported router to get the ability to run a VPN server, but make sure you install a build that does support running a VPN server such as OpenVPN. This is beyond the capabilities of some users (and you can easily turn a router into an expensive paperweight if you do it wrong), so what is possible is in part determined by your comfort level with Linux, and how much effort you’re willing to take to make it work.
Another possible advantage of using a VPN is that some of them offer data compression. One problem with streaming satellite video is that satellite feeds in general, and high definition feeds in particular, use HUGE amounts of data. A one hour program can easily consume around 17 GB of data (that’s the largest I have seen so far). So if either you or the place you are sending the programming to has usage caps, you probably don’t want to do this, at least not without compressing the data first.
I’ve never personally used playlists or done anything with them, so I can’t respond to any questions about that. That may even be something that would be specific to your client software (XBMC/Kodi if that is what you use). I would suggest you might get better and more informed answers to that type of questions you have asked here by posting in the TVHeadEnd forums.
Ditto agreed!
In Configuration / DVB inputs / Muxes, you will see your frequency block of channels (10.977V etc) and this will have all the channels provided from that frequency. The clickable link that says ‘Play’ is the link that will provide an effective playlist. Don’t actually left lick on the link, as you will merely download that lot forever. Right click, copy the link and then try it in say VLC (Open Network Stream and paste it in to Play)
You will then get the first of the programmes. If you want to select them in VLC, go to Playback and then Programs. You get the list. That is effectively a playlist. If you want the individual channels, then assign channels from the list and do the same but in the Services section for each individual channel.
I use the above method with individual channel links and use the online VLC media plugin you can find out there. It merely uses VLC to provide a media player front end embedded into a page.
An example page (you just paste in your SINGLE channel address link in the two areas you can see below):
countzorg: It appears that WordPress doesn’t support images in comments unless you put them on an external site and then link to them. If you can upload your example page somewhere, post the URL in a comment and I will see that it gets linked to this one.
PS The MOI+ boxes are great. The service is great too.
TVHeadend is pretty decent. It just requires some playing with.
The original review here is very good and points out the good and the bad. Security is a bit of an issue. Best to keep on your local network. It’s for home!
What makes the MOI+ a better option than popping the quad tuner into a server with a free pcie slot and running tvheadend? Is there good support for installing the drivers?
There are pros and cons to everything, and if you have the ability to build your own server and install TVHeadEnd, you may find that’s the better option for you. Some people prefer a small “appliance” type device that doesn’t use much power.
As for the drivers, funny you should ask about that. One of the disadvantages of building your own server, which is not really a huge disadvantage to anyone with a bit of Linux experience, is that you need to download and compile the TBS drivers before it will work (obviously, those drivers are included in the MOI+ firmware, so you don’t have to worry about them there). That would not be so bad in itself, but the real hassle is that you have to do it again every time there is a kernel update. And if you know anything about Linux, you know that most of the major distros love to push out a kernel update every few weeks. So you either skip the kernel updates (and possibly miss security updates), or you resign yourself to having to recompile the drivers every time you allow a kernel update to install.
From what I have read, I get the impression that this is something a bit unique to TBS cards, and that with many other brands of cards you don’t have to do this. Now, whether you find this objectionable probably depends on your level of expertise with Linux. Some people might even consider it a fun way to spend a couple of minutes. I personally think it to be more an annoyance than a real problem, still it’s something I would rather not have to deal with.
You can go either way and I have tried both, and found that while the MOI+ was easier to get going, the standalone server has some advantages too. The biggest advantages are probably that most motherboards contain real-time clock circuitry that actually keeps accurate time, so you don’t get the occasional recording with bad time info (which pretty much prevents you from moving around within the recording – you can only watch it from start to finish), that you have a lot more options for connecting external storage, and that you can get regular updates of the operating system and software you use (albeit with the driver issue mentioned above). The advantages of the MOI+ are low power consumption, a small footprint (even possible to rackmount it if you’re into that), and you don’t have to compile the drivers, in fact you don’t need to know a whole lot about Linux at all. Plus, unless you already have the hardware sitting around, a MOI+ will cost a lot less than setting up a new backend system, and it’s a lot less work and probably a whole lot less frustration (except for the clock issue). And, they give you really decent instructions for setting up TVHeadEnd. But at the same time, if you are willing to go through the effort of setting up a dedicated backend system and are motivated to do so, you’ll probably be happier with the end result, assuming you have the Linux knowledge to pull it off.
(I should add that the MOI+ clock issue apparently only manifests itself if you attempt to keep the time set automatically by running ntpd as a service as I have suggested in the article. If you are willing to go into the backend and manually reset the time every few days, at a time when nothing is being recorded, then you likely won’t ever see this problem, but if you forget to go in and reset the time then your recordings may start late or end early. I will note that there may be other ways to make the time stay accurate that do not cause this problem; I just don’t know about them. Also, there can be other reasons to have time issues in recordings – see the article Getting bad satellite recordings in TVHeadEnd? Here’s a possible fix).
By the way, if you do intend to go the “build your own” route, I will warn you that not all motherboards will work for this purpose. Before you just start buying parts, ask around in the various forums and see what others are using. One motherboard that I know works in at least one such system is the MSI B85M-G43 but I am not suggesting that is the only motherboard that will work, or even the best for the purpose. Also make sure that your TBS tuner card is not sharing an IRQ with any other device, because that can cause problems. Whichever direction you decide to go, I wish you the best of luck (and if you’re not very Linux-proficient and decide to go the “build your own server” route, you’ll probably need it!).
Can you please explain what to use and how to stream with one adapter to many clients. Tvheadend seems to be unable to do that. My second question is if possible to use cccam account and how. I have moi+ with tbs6991 ( without SE 🙂 )
Unless you are defining the word “stream” differently than I do, I don’t quite understand your question. Tvheadend is perfectly capable of streaming live TV signals to many clients, if the clients are compatible with TVheadend. For example I have multiple systems running Kodi and they can all watch live or recorded TV from Tvheadend simultaneously, as long as there are enough tuners available to meet all requests. Now, if your need is to steam one single channel live to several client systems then Tvheadend might not be the best tool for the job; perhaps Mumudvb or DVBlast (both included on the MOI+ and both linked near the top of the article) would be a better choice. But for general usage where you want to be able to change channels and maybe stream different signals to different TV’s, Tvheadend would be the top choice.
If you have questions about Tvheadend usage, you might want to try the Tvheadend forums. I can’t answer your question about cccam because I’m not at all familiar with it; it appears to be some kind of European service. It may be possible to set it up from within Tvheadend but you would need to ask in their forums.
It’s clear think you for the answer . I couldn’t have more tuners because I’m leaving in the appartement Where I’m allowed to have only two sat cables. Each one contain two or three LNB’s.
Those boxes are dirt-cheap and, when used with dvblast, don’t put any significant toll on CPU (5-6% per transponder). So I tried it with cheap PCIe splitter and only caveat is that it doesn’t seem to support more than 4 logical adapters. But, if you need 4 transponders with CI interfaces – 2 of TBS6991SE via PCIe splitter are doing the trick just fine. You will have to make your own enclosure and provide a bit of additional power for splitter though.
I just received a reply from support on 4 adapter limitation ( http://www.tbsdtv.com/forum/viewtopic.php?f=164&t=9522&sid=f5a371147fae224d0342d576131d3456 ), so this box looks even better now.
I’m having this device and I’m disappointed that it’s impossible to mount cifs NAS drive.
I’have tried also to mount nfs network drive but alsko without succes ;-(
Worst of all that even on tbsdtv forum we can’t het support ;-(
http://www.tbsdtv.com/forum/viewtopic.php?f=164&t=9689
Maybe anyone has experience how to mount network drive to record programs.
I’m not a Linux expert but I suspect the issue is that the mount command on the MOI+ is part of BusyBox, and many BusyBox commands have different syntax or options than their counterparts in a desktop version of Linux such as Ubuntu. See the entry for mount on this page:
https://busybox.net/downloads/BusyBox.html
If you search on a phrase such as “how to mount a network share in BusyBox” (without the quotes) you will see that many people running Busybox-based systems have issues doing this, and it seems to be tied to a problem with the “mount” command in Busybox. For example OpenWRT users have a similar issue, and someone there suggested using the “smbclient” command instead of “mount”:
https://github.com/openwrt/packages/issues/795
On another list there is talk of using the cifs-utils package:
http://forum.tinycorelinux.net/index.php?topic=8487.0
Anyway I think that the fact that “mount” is handled by BusyBox and that it is maybe a bit buggy, or uses non-standard syntax is the root of your problem, so I would look to BusyBox help forums or include “BusyBox” in any searches you do to get more correct answers. If you do get it working I would appreciate it if you could come back and post the correct syntax, since I suspect that it would probably be helpful to others who would like to use external storage for recordings.
Also, something else to TRY, although I do not know if this applies to BusyBox or not, but I have seen it mentioned a few times. Try running “insmod cifs” followed by your mount command, but make sure you include the “-t cifs” option. For example on some systems (not necessarily BusyBox) it might look like this:
insmod cifs
mount -t cifs SomeName /cifs1 -o unc=\\\\IP.address.of.server\\ShareName,username=guest
or instead of the above mount command, maybe something like this, seen on another site (I don’t know if the initial “busybox” command is needed here):
busybox mount -t cifs //192.168.1.10/share /mnt/cifs/share -o unc=\\\\192.168.1.10\\share,username=xxx,password=xxx
This is just a shot in the dark but since no one else suggested it and since insmod is in the list of commands provided by BusyBox I thought I’d at least suggest looking into it.
One final thought, see this thread on mounting a CIFS share from the BusyBox mailing list:
http://lists.busybox.net/pipermail/busybox/2009-April/068753.html
(keep clicking “Next message:” to follow the thread)
Unfortunately the conclusion of this thread is a broken link so the solution never appears. 😦 But you may want to temporarily join the mailing list yourself and post your question there if nothing else works:
http://lists.busybox.net/mailman/listinfo/busybox
So many thanks for all just provide me all examples. I tried all solutions but non of this works just to mount network drive.
I think that the only one way to map network drive is nfs, because cifs did’t work and I cant install cifs-utils on this device
[root@moi /]# mount
rootfs on / type rootfs (rw)
/dev/root on / type yaffs2 (rw,relatime)
proc on /proc type proc (rw,relatime)
devpts on /dev/pts type devpts (rw,relatime,gid=5,mode=620)
tmpfs on /dev/shm type tmpfs (rw,relatime,mode=777)
tmpfs on /tmp type tmpfs (rw,relatime)
sysfs on /sys type sysfs (rw,relatime)
I’m getting error
mount: mounting //192.168.1.1/share/rec on /mnt/net failed: No such device
I hope that anyone who is using this kind of device will share working solutions.
My best suggestion to you at this point is to join the BusyBox mailing list at http://lists.busybox.net/mailman/listinfo/busybox and post your question there. Those folks should be able to tell you how to do it.
Anyone tried to re-stream HD homerun channels to a remote location